To list files larger than 10M:
find / -type f -size +10000k -exec ls -lh {} \; | awk '{ print $8 ": " $5 }'
To list files larger than 100M:
find / -type f -size +100000k -exec ls -lh {} \; | awk '{ print $8 ": " $5 }'
12/17/2010
11/29/2010
how to convert tables to InnoDB
Using nice tool from Maatkit, we can easy convert tables from any storage engine to other. there is example how to convert from myisam to innodb
mk-find db-name --engine MyISAM --exec "ALTER TABLE %D.%N ENGINE=INNODB" --print
11/22/2010
how to install php5.3.x & 5.2.x centos
there are 3 steps how to install/upgrade php on centos server/vps
1. install webtatic repo:
2. install/upgrade php 5.3.x
yum --enablerepo=webtatic install php
yum --enablerepo=webtatic upgrade php
3. install/upgrade php 5.2.x
yum --enablerepo=webtatic --exclude=php*5.3* update php
yum --enablerepo=webtatic --exclude=php*5.3* install php
1. install webtatic repo:
rpm -ivh http://repo.webtatic.com/yum/centos/5/`uname -i`/webtatic-release-5-1.noarch.rpm
2. install/upgrade php 5.3.x
yum --enablerepo=webtatic install php
yum --enablerepo=webtatic upgrade php
3. install/upgrade php 5.2.x
yum --enablerepo=webtatic --exclude=php*5.3* update php
yum --enablerepo=webtatic --exclude=php*5.3* install php
10/08/2010
reset CPAN first run
to reset CPAN configuration it is necessary to run this command
perl -e "use CPAN::FirstTime; CPAN::FirstTime::init();"
perl -e "use CPAN::FirstTime; CPAN::FirstTime::init();"
9/20/2010
3 ways to reset root password in linux
today I'm gonna to explain how to reset root password in linux. 2 of this ways can be applied only if you have access to PC physically. 3rd way can be applied if your service provider have recovery console or something like that:)
so lets start:
1 EDITING LOADER (in my case it will be GRUB)
boot machine
when the GRUB menu appears, use arrow keys to choose OS to be booted
press letter "e'' on the keyboard to enter edit mode
use arrow keys to select the kernel line for kernel to be booted
press "e" to edit line
go to end of line and type "single" (without quotes) as a separate word
press ESC key to exit the edit mode
press "b" to boot into single user mode
after booting you can set password for root by running passwd commnad
reboot and login with new pw
2. MAGIC WAY :)
If the easy method doesn't work on your machine, another way to solve the "lost root password" problem is to boot your computer from your Linux Installation CD/DVD, or from a live-CD/DVD such as Knoppix.
Boot with the live-disk then go to a terminal and su to root (no password is required) then issue the following commands (be sure to replace each /sda1 with your own root partition device):
Once you are into your system /etc directory, you can use a text editor (vim, nano, pico, etc.) to edit the /etc/shadow file where the password is stored. Various information about root and user accounts is kept in this plain-text file but we are only concerned with the password portion.
For example, the /etc/shadow entry for the "root" account may look something like this:
Now, using your favorite editor (I'll use vim) delete the password hash. For this example, the password is in green text and is all those characters between the 1st and 2nd colons.
After you've edited this field, it should look like this:
Now save the file and change back to the root directory and unmount the system root partition (don't forget to change the /sda1) as follows:
Now reboot the computer.
Once the computer has booted and you're at the login prompt, type "root" and when asked for the password just press ENTER (entering no password). After a successful login, you need to set the new password for root using the following command:
this way was not tested by me and I found it in google :)
3.RECOVERY CONSOLE or LIVE CD/DVD
1.Boot from LIVECD or in RC
2. mount root partition
- if no raid on server than
mount /dev/hda2 /mnt/newroot
- if you have raid
mount /dev/md1 /mnt/newroot
NOTE make sure that you replace hhd name with your own
3. Bind /dev/random from your server
mount –bind /dev /mnt/newroot/dev
4. changing the root file system. (e.g.):
# chroot /mnt/newroot /bin/bash
5.change root password
passwd
6. reboot in normal mode
so lets start:
1 EDITING LOADER (in my case it will be GRUB)
boot machine
when the GRUB menu appears, use arrow keys to choose OS to be booted
press letter "e'' on the keyboard to enter edit mode
use arrow keys to select the kernel line for kernel to be booted
press "e" to edit line
go to end of line and type "single" (without quotes) as a separate word
press ESC key to exit the edit mode
press "b" to boot into single user mode
after booting you can set password for root by running passwd commnad
reboot and login with new pw
2. MAGIC WAY :)
If the easy method doesn't work on your machine, another way to solve the "lost root password" problem is to boot your computer from your Linux Installation CD/DVD, or from a live-CD/DVD such as Knoppix.
Boot with the live-disk then go to a terminal and su to root (no password is required) then issue the following commands (be sure to replace each /sda1 with your own root partition device):
Code:
mount -o dev,rw /mnt/sda1

cd /mnt/sda1/etc
For example, the /etc/shadow entry for the "root" account may look something like this:
Code:
root:$1$aB7mx0Licb$CTbs2RQrfPHkz5Vna0.fnz8H68tB.:10852:0:99999:7:::
Code:
vim shadow
Code:
root::10852:0:99999:7:::
Code:
cd /
umount /mnt/sda1
Once the computer has booted and you're at the login prompt, type "root" and when asked for the password just press ENTER (entering no password). After a successful login, you need to set the new password for root using the following command:
Code:
passwd
3.RECOVERY CONSOLE or LIVE CD/DVD
1.Boot from LIVECD or in RC
2. mount root partition
- if no raid on server than
mount /dev/hda2 /mnt/newroot
- if you have raid
mount /dev/md1 /mnt/newroot
NOTE make sure that you replace hhd name with your own
3. Bind /dev/random from your server
mount –bind /dev /mnt/newroot/dev
4. changing the root file system. (e.g.):
# chroot /mnt/newroot /bin/bash
5.change root password
passwd
6. reboot in normal mode
9/14/2010
installin JDK and JRE gentoo way
had a task to install JDK and JRE on customer server. And when I found that on server Gentoo has been installed it was too late for me :) ( it is my first experience with Gentoo)
so there are the steps
1. update portage
#emerge --sync
2. install JDK/JRE
# emerge virtual/jdk
or
# emerge virtual/jre
3. Configuring JVM
ref http://www.gentoo.org/doc/en/java.xml
so there are the steps
1. update portage
#emerge --sync
2. install JDK/JRE
# emerge virtual/jdk
or
# emerge virtual/jre
3. Configuring JVM
list of java virtual machines
# java-config --list-available-vms
out put should be like:
# java-config --list-available-vms
The following VMs are available for generation-2:
1)      IcedTea6-bin 1.4.1 [icedtea6-bin]
2)      Sun JDK 1.5.0.20 [sun-jdk-1.5] (Build Only)
3) Sun JDK 1.6.0.16 [sun-jdk-1.6]set VM
(By handle (preferred))
# java-config --set-system-vm sun-jdk-1.6
Now using sun-jdk-1.6 as your generation-2 system JVM
(By number)
# java-config --set-system-vm 3
Now using sun-jdk-1.6 as your generation-2 system JVM
ref http://www.gentoo.org/doc/en/java.xml
9/10/2010
Mysql master-master replication
Today I’m going to write a short manual how to create failover mysql cluster.
What we need:
Server1 = master 1/slave2
Server2 = master2/slave2
Internal or external IPs (in this example I will use server1 _ip and server2_ip)
Replication user = replicau
Step-by-step how to:
Step 1.
On server 1 in my.cnf we need to add following lines
[mysqld]
#master config
Server-id =1
Log-bin = mysql-bin
binlog-do-db = test_db
… #we can add as many DB as we need to replicate
#slave config
replicate-do-db = test_db
… #we can add as many DB as we need to replicate
master-host = server2_ip
master-user= replicau
master-password =password_of_user_replicau
master-port = 3306
same lines we should add in my.cnf on server2, the only thing we should change is master-host parameter to use server1_ip instead of server2_ip and change server-id parameter
Step 2
Restart mysql servers
Step 3
On each server we need to create replication user:
Server1
mysql>GRANT REPLICATION SLAVE, REPLICATION CLIENT ON *.* TO 'replicau'@'server2_ip' IDENTIFIED BY 'password';
server2
mysql> GRANT REPLICATION SLAVE, REPLICATION CLIENT ON *.* TO 'replicau'@'server1_ip' IDENTIFIED BY 'password';
Step 4
Add server2 as slave to server1
- we need to set read_only parameter as ON on server1 (master 1)
mysql> SET GLOBAL read_only = ON;
mysql> show master status;
mysql> show master status;
+------------------+----------+--------------+------------------+
| File | Position | Binlog_Do_DB | Binlog_Ignore_DB |
+------------------+----------+--------------+------------------+
| mysql-bin.000006 | 7984 | | |
+------------------+----------+--------------+------------------+
1 row in set (0,00 sec)
on server2
mysql>slave stop;
mysql> CHANGE MASTER TO MASTER_HOST = "server2_ip", MASTER_USER = "replicau", MASTER_PASSWORD = "password_of_user_replication", MASTER_LOG_FILE = "mysql-bin.000006", MASTER_LOG_POS = 7984;
mysql> slave start;
on server1
mysql> SET GLOBAL read_only = OFF;
on server2 check connection status
mysql> show slave status;
if we do not receive any errors, everything is perfect
Step 5
Do Step 4 for connecting server 1 as slave to server2.
Step 6
Check if everything is fine, if no try from step 1
Step 7
It’s time to have a cup of coffee/tea of a bottle of beer
9/09/2010
enable snmp windows 7
To install SNMP on Windows 7, open Control Panel and then click on Programs and Features. Then, click on "Turn Windows features on or off" link in the left pane. If UAC prompted, then click on Yes. Then, in the Windows Features window, scroll down and select "Simple Network Management Protocol (SNMP)" check box and click on OK. Then, wait for some time to install SNMP.
After installing SNMP, click on Start Orb and then type Services.msc in the Search box and hit Enter. Then, scroll down in the right pane and right click on SNMP Services and select Properties. Then, click on Traps tab. Now, in the Community Name box, type the community name to which your computer will send trap messages and then click on "Add to list" button. Then, click on Apply and then OK.
After installing SNMP, click on Start Orb and then type Services.msc in the Search box and hit Enter. Then, scroll down in the right pane and right click on SNMP Services and select Properties. Then, click on Traps tab. Now, in the Community Name box, type the community name to which your computer will send trap messages and then click on "Add to list" button. Then, click on Apply and then OK.
8/19/2010
7/12/2010
6/26/2010
Remove IP from Real time Blacklist
AOL:
Request whitelist – http://postmaster.info.aol.com/whitelist/whitelist_guides.html
Remove from RBL – http://postmaster.info.aol.com/waters/sa_form.html
Hotmail:
Remove from RBL – http://ipremoval.sms.symantec.com/lookup/
Yahoo!:
Request whitelist – http://help.yahoo.com/l/us/yahoo/mail/postmaster/postmaster_wl.html?from_url=http://help.yahoo.com/l/us/yahoo/mail/postmaster/index.html
Remove from RBL – http://help.yahoo.com/l/us/yahoo/mail/postmaster/defer.html?from_url=http://help.yahoo.com/l/us/yahoo/mail/postmaster/index.html
6/23/2010
add repos into suse
recently I had a problem with adding repos into Suse. Unfortunately Google said that it is easy, but for newbie lime me it was very difficult :)
but finally I find the way how to add repos so
1. find link to repo
I suppose that this link will be very useful http://en.opensuse.org/Additional_package_repositories
2 in console please run this command
that's all :)
but finally I find the way how to add repos so
1. find link to repo
I suppose that this link will be very useful http://en.opensuse.org/Additional_package_repositories
2 in console please run this command
# zypper ar URL alias
URL- from 1.
Alias - type whatever you want
that's all :)
6/22/2010
How to Install FFmpeg in Linux ~centos way~
FFmpeg is so important if you are planning to run a video website with streaming with conversion of video files to different video formats. This tutorial is intended for Centos/Redhat versions of Linux where any novice user can install ffmpeg without compiling the source which is a more traditional way of installing the FFmpeg software on linux servers. In this tutorial i will show you the easy way to install ffmpeg and ffmpeg-php (php extension) with just yum rather than compiling ffmpeg from source files.
FFmpeg (http://ffmpeg.mplayerhq.hu)
Mplayer + Mencoder (http://www.mplayerhq.hu/design7/dload.html)
Flv2tool (http://inlet-media.de/flvtool2)
Libogg + Libvorbis (http://www.xiph.org/downloads)
LAME MP3 Encoder (http://lame.sourceforge.net)
FlowPlayer - A Free Flash Video Player - http://flowplayer.org/
Installing FFMpeg
yum install ffmpeg ffmpeg-devel
If you get package not found, then you will need to add few lines in the yum repository for dag packages installation. Create a file named dag.repo in /etc/yum.repos.d with the following contents on it
[dag]
name=Dag RPM Repository for Red Hat Enterprise Linux
baseurl=http://apt.sw.be/redhat/el$releasever/en/$basearch/dag
gpgcheck=1
enabled=1
then
yum install ffmpeg ffmpeg-devel
If everything is fine, then the installation should proceed smoothly. If not you will get something like warning GPG public key missing .
Common Errors
To fix rpmforge GPG key warning:
rpm -Uhv http://apt.sw.be/redhat/el5/en/i386/rpmforge/RPMS/rpmforge-release-0.3.6-1.el5.rf.i386.rpm
For more information refer to this faq depending on Centos version
Missing Dependency Error:
If you get missing dependency error like shown below, in the middle of ffmpeg installation
Error: Missing Dependency: libc.so.6(GLIBC_2.4) is needed by package ffmpeg
Error: Missing Dependency: libtheora.so.0(libtheora.so.1.0) is needed by package ffmpeg
Error: Missing Dependency: rtld(GNU_HASH) is needed by package ffmpeg
Error: Missing Dependency: libc.so.6(GLIBC_2.4) is needed by package imlib2
Error: Missing Dependency: rtld(GNU_HASH) is needed by package a52dec
Error: Missing Dependency: rtld(GNU_HASH) is needed by package imlib2
Error: Missing Dependency: rtld(GNU_HASH) is needed by package gsm
Error: Missing Dependency: libc.so.6(GLIBC_2.4) is needed by package x264
Error: Missing Dependency: rtld(GNU_HASH) is needed by package xvidcore
Error: Missing Dependency: libc.so.6(GLIBC_2.4) is needed by package lame
Error: Missing Dependency: libc.so.6(GLIBC_2.4) is needed by package a52dec
Error: Missing Dependency: rtld(GNU_HASH) is needed by package faad2
Error: Missing Dependency: rtld(GNU_HASH) is needed by package x264
Error: Missing Dependency: rtld(GNU_HASH) is needed by package lame
Error: Missing Dependency: libc.so.6(GLIBC_2.4) is needed by package xvidcore
Error: Missing Dependency: libc.so.6(GLIBC_2.4) is needed by package faac
Error: Missing Dependency: libc.so.6(GLIBC_2.4) is needed by package faad2
Error: Missing Dependency: libgif.so.4 is needed by package imlib2
Error: Missing Dependency: rtld(GNU_HASH) is needed by package faac
Error: Missing Dependency: libc.so.6(GLIBC_2.4) is needed by package gsm
Error: Missing Dependency: libpng12.so.0(PNG12_0) is needed by package imlib2
Error: Missing Dependency: rtld(GNU_HASH) is needed by package libmp4v2
Error: Missing Dependency: libc.so.6(GLIBC_2.4) is needed by package libmp4v2
then most commonly you have GLIB 2.3 installed instead of GLIB 2.4 version. To check the current GLIB version installed on your server. just use
yum list glib*
and it should list the latest GLIB package version.
The reason i was getting this error was my rpmforge packages was pointed to centos 5 versions instead of centos 4.6.
To fix dependency error:
To fix this error, you might need to check your rpmforge packages compatible to the release of your existing CentOS version.
Check the file /etc/yum.repos.d/rpmforge.repo and it should look like for Centos 4.6(Final). If you have lines like http://apt.sw.be/redhat/el5/en/mirrors-rpmforge you might need to make changes to the rpmforge.repos like shown below
Note: Backup the original rpmforge.repo file before you edit its content.
[rpmforge]
name = Red Hat Enterprise $releasever - RPMforge.net - dag
#baseurl = http://apt.sw.be/redhat/el4/en/$basearch/dag
mirrorlist = http://apt.sw.be/redhat/el4/en/mirrors-rpmforge
#mirrorlist = file:///etc/yum.repos.d/mirrors-rpmforge
enabled = 1
protect = 0
gpgkey = file:///etc/pki/rpm-gpg/RPM-GPG-KEY-rpmforge-dag
gpgcheck = 1
To know what linux type and version you are running
cat /etc/redhat-release
Once this is done, do again yum install ffmpeg.
This trick resolved the problem in my linux box running Centos 4.6 and this is the only way i found to install ffmpeg using yum.
To check the FFmpeg working:
Finally, check the ffmpeg whether it is working or not.
> ffmpeg
> ffmpeg -formats
> ffmpeg --help
// This lists path of mpeg, its modules and other path information
ffmpeg -i Input.file Output.file
To check what audi/video formats are supported
ffmpeg -formats > ffmpeg-format.txt
Open the ffmpeg-formats.txt to see the ooutput
D means decode
E means encode
V means video
A means audio
T = Truncated
Install FFMPEG-PHP Extension
FFmpeg-php is a very good extension and wrapper for PHP which can pull useful information about video through API interface. Inorder to install it you will need to download the source file and then compile and install extension in your server. You can download the source tarball : http://ffmpeg-php.sourceforge.net/
wget http://sourceforge.net/projects/ffmpeg-php/files/ffmpeg-php/0.6.0/ffmpeg-php-0.6.0.tbz2/download
tar xf ffmpeg-php-0.6.0.tbz2
cd ffmpeg-php-0.6.0
phpize
./configure && make && make install
echo 'extension=ffmpeg.so' > /etc/php5/conf.d/ffmpeg.ini
php -i |grep -i ffmpeg
Ensure it shows ffmpeg extension. Restart apache to let PHP use it too
/etc/init.d/apache2 restart
P.S.
On Suse 11 I have met compilation problem (PIX_FMT_RGBA32 undeclared ). It has been described here:
http://ubuntuforums.org/showthread.php?t=902247
I repeat solution:
vi ffmpeg_frame.c
:%s/PIX_FMT_RGBA32/PIX_FMT_RGB32
:wq
Common Errors
1. If you get command not found error for phpize, then you will need to do yum install php-devel
2. If you get error like "ffmpeg headers not found" while configuring the source.
configure: error: ffmpeg headers not found. Make sure ffmpeg is compiled as shared libraries using the --enable-shared option
then it means you have not installed ffmpeg-devel packages.
To Fix: Just install ffmpeg-devel using
yum install ffmpeg-devel
3. If you get an error like shared libraries not found problem and the program halts in the middle, then you must specify the ffmpeg installed path explicitly to the ./configure.
configure: error: ffmpeg shared libraries not found. Make sure ffmpeg is compiled as shared libraries using the --enable-shared option
To Fix:
1. First find out the ffmpeg path with ffmpeg --help command. The prefix default path should be like /usr/local/cpffmpeg
2. Configure the FFmpeg-php with --with-ffmpeg option
./configure --with-ffmpeg=/usr/local/cpffmpeg
That should resolve the problem!
Editing PHP.INI
Once you have done that without any problems then you will see the php extension file /usr/local/lib/php/extensions/no-debug-non-zts-20060613/ffmpeg.so and you will need mention that extension in php.ini file
nano /usr/local/lib/php.ini
Put the below two lines at the end of the php.ini file
[ffmpeg]
extension=ffmpeg.so
Then restart the server service httpd restart
To check whether ffmpeg enabled with php, point your browser to test.php file. It should show the confirmation of installed ffmpeg php extension
// #test.php
<?php
phpinfo()
?>
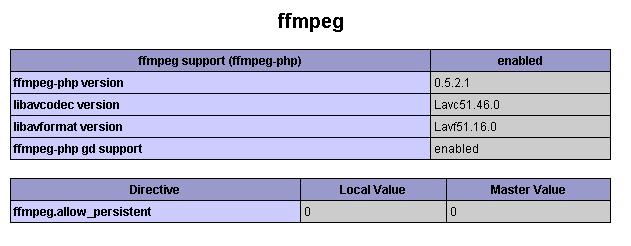
If any case the ffmpeg does not show in the phpinfo() test make sure that php.ini path to ffmpeg.so is correct. Still the problem occurs, the reason could be you might be using older versions of ffmpeg-php which is buggy. Just download the latest version of ffmpeg-php source then compile it.
Installing Mplayer + Mencoder
Just issue the following yum commands to install the rest of the packages.
yum install mplayer mencoder
Installing FlvTool2
Flvtool2 is a flash video file manipulation tool. It can calculate metadata and can cut and edit cue points for flv files.
If you are on Centos 5 try yum install flvtool2 with dag repository and if you get package not found you will need to manually download and compile the flvtool2. You can download latest version of flvtool2 here: http://rubyforge.org/projects/flvtool2/
wget <url-link>
ruby setup.rb config
ruby setup.rb setup
sudo ruby setup.rb install
If you get command not found error, it probably means that you dont have ruby installed.
yum install ruby
Thats it! Once ffmpeg works fine with php extension, download a sample video, convert to .flv format in the command line and plug it to flowplayer to see it work on your web browser. Try also to download the video file offline and see whether the converted flv file works well with both audio and video.
6/01/2010
[FIX] #1153 – Got a packet bigger than ‘max_allowed_packet’ bytes
If you get such king of error #1153 – Got a packet bigger than ‘max_allowed_packet’ bytes
there are the steps how to fix this
1. login into your server
2. enter into mysql
set this 2 variables
set global max_allowed_packet=1000000000;
set global net_buffer_length=1000000;
3. exit from mysql
4. add this line into my.cnf
max_allowed_packet=16M
5 restart mysql
/etc/init.d/mysql restart
6. upload dump :)
5/10/2010
SuggestiMate for JIRA
SuggestiMate for JIRA
- Do you use Atlassian JIRA for issue or project tracking?
- Do you want to avoid duplicate issues?
- Do you want to save heaps of time on searching for related issues?
Then our new product SuggestiMate for JIRA is right for you.
SuggestiMate for JIRA dramatically improves your JIRA user experience by adding dynamic similar issues instant search directly to the heart of your JIRA. Give it a try today!
5/02/2010
5/01/2010
installation fcgi with ruby
This is a small how to install fcgi to work with ruby and rails.
first of all you should have ruby and rails installed on your server. In my case I installed ruby and rails using standard Debian command
apt-get install ruby gem rails
to make sure that you use the latest version of rails I recommend to check installation with gem:
gem install rails
after that I was ready to install fcgi on my server:
cd /temp
wget http://www.fastcgi.com/dist/fcgi-2.4.0.tar.gz
tar -zxvf fcgi-2.4.0.tar.gz
cd fcgi-2.4.0
./configure --prefix=/usr/local/fcgi --exec-prefix=/usr/local/fcgi
make
make install
Now you can install the fcgi gem (this is a long command which your browser may line-wrap here -- beware that the command is all on the same line):
gem install fcgi -r -- --with-fcgi-lib=/usr/local/fcgi/lib --with-fcgi-include=/usr/local/fcgi/include
You also need to install the FastCGI module for Apache. Make sure you have Perl installed on your shared host, you need it to run apxs!
cd /tempYou may need to add the following block to "/etc/apache2/apache2.conf":
wget http://www.fastcgi.com/dist/mod_fastcgi-2.4.2.tar.gz
tar -zxvf mod_fastcgi-2.4.2.tar.gz
cd mod_fastcgi-2.4.2
/usr/sbin/apxs -o mod_fastcgi.so -c *.c
/usr/sbin/apxs -i -a -n fastcgi mod_fastcgi.so
<IfModule mod_fastcgi.c>And finally, you need to configure your Rails project to use FastCGI. Edit the file "(your_rails_app)/public/.htaccess", changing the line:
FastCgiIpcDir /tmp/fcgi_ipc/
AddHandler fastcgi-script .fcgi
</IfModule>
RewriteRule ^(.*)$ dispatch.cgi [QSA,L]to:
RewriteRule ^(.*)$ dispatch.fcgi [QSA,L]
You'll need to restart Apache before the changes will take effect:
/etc/init.d/apache2 restart
4/24/2010
mysql tuning
for high load mysql servers you most probably will need suggestion what parameter you should change to improve performance
First of all I recommend to run mysqltuner script
usage:
wget http://mysqltuner.com/mysqltuner.pl
chmod +x mysqltuner.pl
./mysqltuner.pl
You will be prompted to enter valid mysql credentials and after that you will see recommendation what should you tune on your mysql server
mysql optimize tables
and there I found nice perl script which can be run on your server and you can optimize tables in DB
you can download it from there
4/20/2010
connection count
nice command for counting connection:
netstat -anp |grep 'tcp\|udp' | awk '{print $5}' | cut -d: -f1 | sort | uniq -c | sort -n
netstat -anp |grep 'tcp\|udp' | awk '{print $5}' | cut -d: -f1 | sort | uniq -c | sort -n
4/18/2010
Mount remote FS using SSH
for different purposes you may need to copy a lot of files from your machine to remote. You can use SFTP or SCP but more beautiful solution is mounting remote catalogs in your system using ssh. As my favorite Linux is Debian, so all examples are for this distr.
1. installation SSHFS support
apt-get install sshfs
2. MODULE LOAD
modprobe fuse
3. setup permissions
adduser username fuse
chown root:fuse /dev/fuse
4. mount remote catalogs
mkdir ~/remoteserver
sshfs username@host:/path ~/remoteserver
and for unmounting you can use this command
umount ~/remoteserver
4/17/2010
3/30/2010
Sysinternals Suite
New Sysinternals Suite available for download
The Suite is a bundling of the following selected Sysinternals Utilities:
3/24/2010
Mielophone
Mielophone small AIR application.
Mielophone can:
- looking for tracks by authors
- looking for tracks by albums
- looking for tracks by genre
- play tracks
- download tracks
- looking for video and play it
- create playlist based on selected author
- LastFM scrubbing
Using Windows Live Writer with Joomla
What is Windows Live Writer?
Windows Live Writer is a desktop blogging application that enables you to write content for your website from the Windows Live Writer application.
Why use Windows Live Writer with Joomla?
Windows Live Writer makes the process of adding content to your website a breeze.
Rather than having to log into the Joomla backend and write your new content in a cumbersome WYSIWYG editor, you can use the familiar office style writing environment. Once you've written your content, you simply need to press 'publish' button from within Windows Live Writer and your article will be online.
How to setup Windows Live Writer in Joomla 1.5
3/22/2010
Change IP in Plesk
IP change in Plesk is not trivial task)))) even if you read all the documentations :)
So if you decide to change IP in Plesk but you can not do this via Plesk panel you should:
1) read this KB http://kb.parallels.com/en/943
2) add new IP
3) do the trick in Plesk DB
mysql -u admin -p`cat /etc/psa/.psa.shadow
mysql> show databases;
mysql> use psa;
mysql> show tables;
mysql> select * from IP_Addresses;
Now you should see a list of IPs you should delete new IP
mysql> delete from IP_Addresses where id=<your new_ip id>
mysql> quit
/usr/local/psa/bin/reconfigurator.pl <map file>
Do not forget to edit DNS records.
3/02/2010
Broken OS template cache
I got a task to upgrade container with Fedora core 7 to Fedora Core 8. From available information such operation can be run as
vzpkg upgrade VE_ID
So I without any thoughts back up container and run upgrade. But upgrade finished with error about vzquota. after googling all what I found, was information that I should recreate cache. This operation was finished with errors too.
So my workaround is:
1. backup container
2. download OS template from http://www.parallels.com/products/virtuozzo/templates/catalog/
3. install downloaded OS template with force option
vzpkg install template OS_TPL –force
4. recreate OS cache
vzpkg create cache OS_TPL
vzpkg update cache OS_TPL’
5. have fun with OS and container upgrade :)
css and Html layout generator
I often use my brain for generating web site layout. But some times I’m out of ideas, so I need nice & easy tool for generating layouts. Per my investigating somewhere in the web I found 960 grid system. This tool allows you to create div based layout, so you can easily build your web site.
Using this tool I found a couple of things which I don’t like but at least it saves my time :)
2/22/2010
PuTTY Connection Manager
Looking for a tabbed version of famous PuTTY?
PuTTY Connection Manager is a free PuTTY Client Add-on for Windows platforms which goal is to provide a solution for managing multiple PuTTY instances. This is one of the most important missing feature of PuTTY (referring to this and this user complaint)...
Postfix spam control
Postfix 2.x
Open /etc/postfix/main.cf and place the following lines in it (replacing the respective settings if they exist):
vi /etc/postfix/main.cf
[...]
smtpd_helo_required = yes
disable_vrfy_command = yes
strict_rfc821_envelopes = yes
invalid_hostname_reject_code = 554
multi_recipient_bounce_reject_code = 554
non_fqdn_reject_code = 554
relay_domains_reject_code = 554
unknown_address_reject_code = 554
unknown_client_reject_code = 554
unknown_hostname_reject_code = 554
unknown_local_recipient_reject_code = 554
unknown_relay_recipient_reject_code = 554
unknown_sender_reject_code = 554
unknown_virtual_alias_reject_code = 554
unknown_virtual_mailbox_reject_code = 554
unverified_recipient_reject_code = 554
unverified_sender_reject_code = 554

smtpd_recipient_restrictions =
            reject_invalid_hostname,
            reject_unknown_recipient_domain,
            reject_unauth_pipelining,
            permit_mynetworks,
            permit_sasl_authenticated,
            reject_unauth_destination,
            reject_rbl_client multi.uribl.com,
            reject_rbl_client dsn.rfc-ignorant.org,
            reject_rbl_client dul.dnsbl.sorbs.net,
            reject_rbl_client list.dsbl.org,
            reject_rbl_client sbl-xbl.spamhaus.org,
            reject_rbl_client bl.spamcop.net,
            reject_rbl_client dnsbl.sorbs.net,
            reject_rbl_client cbl.abuseat.org,
            reject_rbl_client ix.dnsbl.manitu.net,
            reject_rbl_client combined.rbl.msrbl.net,
            reject_rbl_client rabl.nuclearelephant.com,
            permit
[...]
Restart Postfix afterwards:
/etc/init.d/postfix restart
2/02/2010
Search Engine Optimization Toolkit
The IIS Search Engine Optimization (SEO) Toolkit helps Web developers, hosting providers, and Web server administrators to improve their Web site’s relevance in search results by recommending how to make the site content more search engine-friendly. The IIS SEO Toolkit includes the Site Analysis module, the Robots Exclusion module, and the Sitemaps and Site Indexes module, which let you perform detailed analysis and offer recommendations and editing tools for managing your Robots and Sitemaps files.
Improve the volume and quality of traffic to your Web site from search engines
The Site Analysis module allows users to analyze local and external Web sites with the purpose of optimizing the site's content, structure, and URLs for search engine crawlers. In addition, the Site Analysis module can be used to discover common problems in the site content that negatively affects the site visitor experience. The Site Analysis tool includes a large set of pre-built reports to analyze the sites compliance with SEO recommendations and to discover problems on the site, such as broken links, duplicate resources, or performance issues. The Site Analysis module also supports building custom queries against the data gathered during crawling.
Control how search engines access and display Web content
The Robots Exclusion module enables Web site owners to manage the robots.txt file from within the IIS Manager interface. This file is used to control the indexing of specified URLs, by disallowing search engine crawlers from accessing them. Users have the choice to view their sites using a physical or a logical hierarchal view; and from within that view, they can choose to disallow specific files or folders of the Web application. In addition, users can manually enter a path or modify a selected path, including wildcards. By using a graphical interface, users benefit from having a clear understanding of what sections of the Web site are disallowed and from avoiding any typing mistakes.
Inform search engines about locations that are available for indexing
The Sitemaps and Site Indexes module enables Web site owners to manage the sitemap files and sitemap indexes on the site, application, and folder level to help keep search engines up to date. The Sitemaps and Site Indexes module allows the most important URLs to be listed and ranked in the sitemap.xml file. In addition, the Sitemaps and Site Indexes module helps to ensure the Sitemap.xml file does not contain any broken links.
Site Analysis Features
* Fully featured crawler engine
o Configurable number of concurrent requests to allow users to crawl their Web site without incurring additional processing. This can be configured from 1 to 16 concurrent requests.
o Support for Robots.txt, allowing you to customize the locations where the crawler should analyze and which locations should be ignored.
o Support for Sitemap files allowing you to specify additional locations to be analyzed.
o Support for overriding ‘noindex’ and ‘nofollow’ metatags to allow you to analyze pages to help improve customer experience even when search engines will not process them.
o Configurable limits for analysis, maximum number of URLs to download, and maximum number of kilobytes to download per URL.
o Configurable options for including content from only your directories or the entire site and sub domains.
* View detailed summary of Web site analysis results through a rich dashboard
* Feature rich Query Builder interface that allows you to build custom reports
* Quick access to common tasks
* Display of detailed information for each URL
* View detailed route analysis showing unique routes to better understand the way search engines reach your content
Robots Exclusion Features
* Display of robots content in a friendly user interface
* Support for filtering, grouping, and sorting
* Ability to add ‘disallow’ and ‘allow’ paths using a logical view of your Web site from the result of site analysis processing
* Ability to add sitemap locations
Sitemap and Sitemap Index Features
* Display of sitemaps and sitemap index files in a simple user interface
* Support for grouping and sorting
* Ability to add/edit/remove sitemap and sitemap index files
* Ability to add new URL’s to sitemap and sitemap index files using a physical or logical view of your Web site
* Ability to register a sitemap or sitemap index into the robots exclusion file
http://www.iis.net/expand/SEOToolkit
1/26/2010
Online Radio as 1,2,3…..
Захотілось мені створити своє радіо так щоб зміг наприклад на роботі увімкнути собі радейко і послухати музику яка є у мене дома на компі. Після довгого гугління я знайшов іформацію що це можна зробити за допомогою SHOUTcast. Отже зараз буде невеличкий мануал як створити собі своє власне онлайн радіо.
Отже створювати радіо ми будемо з допомогою SHOUTcast і Debian 5.x… У моєму випадку це була чиста інсталяція ОС
1. Інсталюємо Debian без Х зі стандартним набором програм, настроюємо ssh. І ломимось на нього з якоїсь нормальної ОС з Х (вінда чи лінух все рівно)
2. Дописуємо наступні рядки у /etc/apt/source.list
deb http://ftp.de.debian.org/debian sid main non-free
## Christian Marillat's Mult-Media Repository for Unstabledeb
http://www.debian-multimedia.org sid main
## Christian Marillat's Mult-Media Repository for Unstable - Experimental Stagingdeb
http://www.debian-multimedia.org experimental main
apt-get --allow-unauthenticated install debian-multimedia-keyring
apt-get update
apt-get upgrade
3. Інсталюємо потрібний софт:
apt-get install lame
wget http://yp.shoutcast.com/downloads/sc1-9-8/sc_serv_1.9.8_Linux.tar.gz SHOUTcast DNAS
wget http://yp.shoutcast.com/downloads/sc_trans_posix_040.tgz SHOUTcast Radio DSP for Unix/Linux/MAC OSX
4. Настроюємо SHOUTcast DNAS
tar xzvf sc_serv_1.9.8_Linux.tar.gz
ls -al
mkdir sc
mv ./sc_serv ./sc
mv ./sc_serv.conf ./sc
mv ./README.TXT ./sc
В цьому файлі дописуємо конфіг сервера vi ./sc/sc_serv.conf
Я змінив наступні параметри:
MaxUser=10 було 32
Password=********* потрібно настроїти без нього радіо працювати не буде
SrcIP=127.0.0.1 потрібно поставити цей праметер щоб ніхто не пробував броудкаститись через вас
5. Настроювання SHOUTcast Radio DSP
у моєму випадку музичні файли знаходяться на фізичній машині на якій крутиться віндовс, а радіо настроєне на віртуалці тому прийшлось настроїти автомонтування віндової шари, як це робиться можна прочитати тут: http://www.debian-administration.org/articles/165
mv ./sc_trans_posix_040.tgz ./sct
cd ./sct/
tar xzvf sc_trans_posix_040.tgz
готуємо плейліст у мене це получилось наступним чином:
find /mnt/win/muz/Rock/ -type f -name *.mp3 >> rock.txt
редагуємо конфіг файл SHOUTcast Radio DSP
sc_trans.conf
PlaylistFile=/root/rock.txt
ServerIP=127.0.0.1 # саме так повинно виглядати це поле так само як у sc_serv.conf
Password=******** такий самий як у sc_serv.conf
Називаємо своє радіо:
StreamTitle=Rock
StreamURL=http:/
Genre=Rock
Виставляємо бітрейт
Bitrate=128000
SampleRate=44100
Channels=2
Quality=6
Далі я підготував файл для того щоб запускати радіо з однієї консолі
cat sstart
#!/bin/sh
/root/sc/sc_serv /root/sc/sc_serv.conf | /root/sct/sc_trans_040/sc_trans_linux /root/sct/sc_trans_040/sc_trans.conf
Тепер до станції можна доступитись з броузера: http://your_ip:8000
FIN
1/16/2010
Как выяснить маску подсети исходя из CIDR ?
Как выяснить маску подсети исходя из CIDR ?

    В кач-ве примера будем использовать IP-адрес 213.45.64.123 с CIDR /27:

    Необходимо взять кол-во бит из CIDR (в бинарном виде), разбить на 4-ре октета и перевести в десятичные.

    1. запишем первые 27 бит как 1-цу, а остальные 5-ть (т.к. их всего 32 бита) как 0-ль

 11111111111111111111111111100000

    2. Разделим на 4-ре октета

 11111111.11111111.11111111.11100000

    3. Переведем в десятичную систему

 255.255.255.224

    Вот и все. Получили что /27 равен маске 255.255.255.224

    Так же полезно просто помнить что:
 сети класса A - это CIDR /8
 сети класса B - это CIDR /16
 сети класса С - это CIDR /24


Как по CIDR определить адрес сети, широковещательный адрес (broadcast), число хостов в сети ?

    В кач-ве примера будем использовать тот же IP-адрес 213.45.64.123 с CIDR /27:

    1. 32-27=5 бит

    2. 2-ка в пятой степени = 32, а значит получается что рабочих IP-адресов в этой сети 30-ть (т.к. 1-ый адрес это адрес сети, а последний это broadcast)

    3. Смотрим последний октет IP-адреса (213.45.64.123), в 123-х целых 32-ек укладывается 3 раза, а значит адрес сети 213.45.64.96 - это 32 умножить на 3 (32х3=96)

    4. Широковещательным адресом (broadcast) будет 213.45.64.127 - это 32 умножить на 4 и отнять 1 (32х4-1=127)


Как по хосту и маске подсети определить адрес сети, широковещательный адрес (broadcast), число хостов в сети ?

    В кач-ве примера будем использовать IP-адрес 192.168.32.48  с маской подсети 255.255.255.192:

    1. 256-192=64, где 192 это последний октет из маски (255.255.255.192), а 64 это общее кол-во хостов в сети,
 т.к. 1-ый адрес это адрес сети, а последний это broadcast получаем 62 рабочих хоста в сети.

    2. Смотрим последний октет IP-адреса (192.168.32.48), в 48 целых 64-рок укладывается ноль получаем адрес сети 192.168.32.0 (0x64=0)

    3. Широковещательным адресом (broadcast) будет 192.168.32.63 (64x1-1=63)
http://subnets.ru/wrapper.php?p=35#que2
1/15/2010
Citrix Xen server 5.5 and snapshots
recently I’ve upgraded my newly installed Xen server from 5.0 to 5.5. And I found that upgraded system won’t took snapshots.
15.01.2010 21:51:46 Error: Snapshotting VM 'apache_db'... - The operation cannot be performed until the SR has been upgradedsuch error appeared when I tried to create snapshot.
this issue can be fixed after upgrading local storage to Storage Repository by doing a right-click to Local Storage
1/14/2010
Enable cURL in IIS
- uncomment the line in your php.ini where it says php_curl.dll and save the file
- copy php5ts.dll and libeay32.dll, ssleay32.dll, php_curl.dll to the WINNT/system32(Windows 2000)/Windows/system32(WindowsXP and 2003) directory
- restart IIS
- check phpinfo page and have fun
1/13/2010
Debian Lenny
Added by Ewan Mellor http://community.citrix.com/display/xs/Debian+Lenny
Comment: Update link point release 3 version of jigdo.
Introduction
From version 5.5 onwards XenServer supports Debian GNU/Linux 5 AKA "Lenny" as a guest Virtual Machine. This includes installation of Lenny from a standard Debian network mirror as well as installation from CD/DVD image.
Note that XenServer 5.5 only supports 32 bit installations of Lenny.
Installation From DVD/CD
Unfortunately at the time of release the Official Debian installation CD and DVD ISO images did not contain a XenServer-compatible kernel and therefore cannot be used with XenServer. To remedy this Citrix has made available a custom built Unofficial DVD image containing a XenServer-compatible kernel.
Downloading A XenServer-compatible installation ISO
Citrix has made the DVD image available using the Jigdo(Jigsaw Download) utility. Jigdo allows ISO images to be downloaded quickly and efficiently by retrieving the majority of the data from a nearby mirror only obtaining a minimal template from the centralised download site.
If you have an existing Debian installation the obtaining jigdo is as simple as running
# aptitude install jigdo-file
If you do not have an existing Debian installation then jigdo can be download from its website. Jigdo is available for both Linux and Windows machines.
Once you have installed jigdo you should select a mirror from the Debian Mirror List. Choose a mirror which is geographically near to your location and which includes the i386 architecture. e.g ftp://ftp.XX.debian.org/debian/
After you have installed jigdo and selected a mirror you are ready to begin downloading the ISO from Citrix. Drop to a shell prompt or command line console. On Windows you will need to change to the directory where you unpacked jigdo.
![]() Note: You must download the image from the URL given. The images available on Debian mirrors are not compatible with XenServer.
Note: You must download the image from the URL given. The images available on Debian mirrors are not compatible with XenServer. ![]()
# jigdo-lite http://ca.downloads.xensource.com/debian/lenny/debian-503-i386-source-xen-DVD-1.jigdo
Jigdo will automatically download the template file (around 40M in size) and then will prompt you for a location to scan for existing packages. This can be useful if you have already downloaded Official Lenny images since you can reuse many of the packages on Official CDs. To do this simply mount or insert the Official CD/DVD and enter the path to it.
Next jigdo will prompt for a mirror to use, enter the mirror you selected above.
Jigdo will then begin downloading packages. If it complains about missing packages you should select another mirror and try again, this will not redownload any packages which were successfully retrieved.
When jigdo has completed it will leave debian-50-i386-source-xen-DVD-1.iso in the current directory.
Adding Additional CD/DVD Images
The custom XenServer-compatible DVD image contains a subset of the Debian software repository.
In order to access the remainder after installation you can either make use of a Debian network mirror in the normal way or you can add additional CD/DVD images using the Official images. To do this simply insert a CD/DVD into the virtual machine's CD drive and on the guest console run
# apt-cdrom add
Repeat this for as many CD/DVD images as you are interested in.
1/04/2010
Convert ape to mp3 in linux (Fedora) Eng
Convert ape to mp3 in linux (Fedora)
Once I received ape file and I wasn't able to listen it in my Linux. I tried to find something user friendly but all found staff was useless. But finally I got this script:
Download ape2.mp3.sh
ape2mp3.sh
#!/bin/bash
echo "Brian's Archive CUE/FLAC Splitter v0.1"
echo "No sanity checking in place. Be careful."
if [ $# != 2 ]
then
echo ""
echo "Usage:"
echo " $0 cue_file ape_flac_file"
echo ""
exit 1
fi
#Get the filenames
cuefile=$1
flacfile=$2
#Other variables
tracks=$(cueprint -d '%N' "$cuefile")
#Get the filenames into an array
count=1
while [ $count -le $tracks ]
do
tracknames[$count]=$(cueprint -n$count -t '%p-%T-%02n-%t' "$cuefile"|sed -e s@/@,@g)
count=`expr $count + 1`
done
#Load up the ID3 tag info into variables for later use
id3count=1
while [ $id3count -le $tracks ]
do
artist[$id3count]=$(cueprint -n$id3count -t '%p' "$cuefile")
album[$id3count]=$(cueprint -n$id3count -t '%T' "$cuefile")
tracknum[$id3count]=$(cueprint -n$id3count -t '%02n' "$cuefile")
title[$id3count]=$(cueprint -n$id3count -t '%t' "$cuefile")
echo "Artist: ${artist[$id3count]}"
echo "Album: ${album[$id3count]}"
echo "Track No: ${tracknum[$id3count]}"
echo "Song Title: ${title[$id3count]}"
id3count=$[$id3count + 1]
done
#Output general file information
cueprint -d '%P - %Tn' "$cuefile"
echo "Total number of tracks: " $tracks
#Split this bitch
cuebreakpoints "$cuefile" | shntool split -a '' -n '%02d' -o wav "$flacfile"
#Convert those waves into mp3s
convertcount=1
while [ $convertcount -le $tracks ]
do
wavenum=`printf "%02d" $convertcount`
lame --add-id3v2 --noreplaygain -b 320 --ta "${artist[$convertcount]}" --tl "${album[$convertcount]}" --tn "${tracknum[$convertcount]}" --tt "${title[$convertcount]}" "$wavenum.wav" "${tracknames[$convertcount]}.mp3"
rm "$wavenum.wav"
convertcount=$[$convertcount + 1]
done
usage: # ape2mp3.sh album.cue album.ape
for correct work you need following packages:
1. mac - http://moonshine.freshrpms.net/rpm.html?id=193 for fedora 7
2. LAME - yum install lame (in fedora)
3. shorten - # rpm -ivh shorten-3.6.0-1.2.i386.rpm
4. shntool - # rpm -ivh shntool-3.0.6-1.i386.rpm
5. cuetools - # rpm -ivh cuetools-1.3.1-2.i386.rpm
Subscribe to:
Posts (Atom)