install Wine (i.e. yum install wine)
download QIP infinum (www.qip.ru)
run with such params: LANG=uk_UA.KOI8-U env WINEPREFIX="/home/
by bshyshka@
I’ve met strange problem. We have primary DNS server as pdns and slave dns as named. In /var/named/named.zone slave zones are correctly included, but there are no zone files in /var/named
How I fixed the problem:
1. restart named
2. run hspc-dns-sync.pl –all at server side
Finnaly I received all zone files in /var/named
Some times we have such problem like: “ohh God my f** Helm goes crazy, it takes 2-5 mins to load page, bull shit, bad product”
So first of all I wanna say - Helm is good product, and you should check your server because it is the main problem :).
Ok lets talk about reasons of the problem:
1. your IIS very loaded.
how to check: run task manager > processes sort by mem and check how much memory w2wp.exe use.
fix: try to restart IIS (run > cmd > iisreset) and try to load Helm CP. If at the begining Helm loads fast and then again become slow, so congratulation you found the reason
2. MSSQL server use more than 1.5 Gb of mem.
how to check: same as in 1.
fix: restart MSSQL server and then steps as in 1. but I want to say that this fix usually temporary because MSSQL begins to “eat” mem very soon :(
3. you have 1 Gb memory installed
how to check: if you have more than 50 web sites running at your server, so you should have at least 2 Gb of mem installed at your server.
fix: add memory
4. You have more than 1000 web sites.
how to check: if its your server then you know how many sites running at your server
fix: there is no fix( in windows
recommendation: install Linux with apache and migrate sites with “Me and my dog” to Linux
5. Virus
How to check: run from liveCD any antivirus
Fix: clean the viruses
Things happen. Plans change. Websites outgrow current servers and need new servers. Hosting companies provide poor service, prompting a web master to decide to change servers. Whatever the reason, you might need to move your Joomla! installation from one server to another.
If you've been running a website for a while, you have probably already accumulated quite a bit of content and several 3rd party components and/or modules, and you do not want to start fresh with a new Joomla! installation. This article explains what I did to move HowToJoomla from my test server (howtojoomla.corywebb.com) to the server that it is on now.
In my case, I probably could have. I only had about 4 or 5 articles on the test site, and I am using relatively few 3rd party CMT's (JomComment, TagBot, and JoomlaXplorer). But, I decided it would be easier just to move the installation I had to the new server, so I did.
You will want to move your Joomla! installation rather than re-install if you fit one or all of the following parameters:
The first thing you want to do is backup all files within your Joomla! installation. Create a folder on your local system, and download all files to that folder using your ftp client application. I used FileZilla as my ftp client application to download all of my files to a folder on my desktop I named "howtojoomla".
Note: For this step, it really helps if you have phpMyAdmin installed on your server. Most hosting companies have phpMyAdmin already installed. If you are unsure, ask your hosting provider.
The second thing you need to do is export your Joomla! database. The best thing to do is to export it into an SQL file, which makes importing it easier in a later step. An SQL file will contain all of the necessary SQL commands for creating your database tables and filling them with your data. Be sure you export the entire database.
This step is very important. Go to the folder on your local system to which you downloaded all of your Joomla! files. In the first level folder, you will find the file named "configuration.php". Open this file with a text editor and make the necessary changes. At the very least, you will probably need to change the following parameters:
Using an ftp client application (like FileZilla), upload all of your files to the location on your new server where you want to install Joomla!.
Using phpMyAdmin (or console commands if you are an advanced database administrator) and the SQL file you generated in step 2, import your old database into your new database.
Your move should now be complete, but please don't take my word for it. Test your site to make sure that everything is in it's proper place and working the way you expect it to. For example, if you did not use relative url's for your links on your old site, they will not work properly on your new site.
If you are uneasy or uncomfortable with this process, I strongly recommend that you hire a professional to do this for you.
I just came across a resource called JoomlaCloner which automates much of this process for you. It has a commercial license, so unfortunately it is not free. The base price is $49.95 for 1 year support and upgrades. I have never used it, so I cannot speak for whether or not it is a good component. I just wanted to make you aware of it.
http://www.howtojoomla.net/content/view/17/2/
UPD: Additional for Joomla 1.5
Edit configuration.php
You have to tell Joomla to use the new database data. Open the configuration.php file on the new server, and edit the following variables to fit the new database and FTP settings:
var $log_path = 'yourfullserverpath/logs';
var $tmp_path = 'yourfullserverpath/tmp';
var $live_site = 'http://www.mysite.com';
var $ftp_host = '127.0.0.1';
var $ftp_port = '21';
var $ftp_user = 'myftpuser';
var $ftp_pass = 'myftppassword';
var $ftp_root = 'myftprootfolder';
var $host = 'mymysqlhost';
var $user = 'mysqluser';
var $db = 'mysqldatabasename';
var $password = 'mysqlpassword';
сабж оновився до реліз кандидата
– перше враження – бета мала симпатичніший інтерфейс
Щасливим власникам Мас mini інколи хочеться підключити свій телефон нокія до цього маленького чуда
Для нормальної роботи вам юуде мотрібно
і б) для тих хто юзає карти нокія Nokia Map Loader for Mac
Дерзайте
#!/bin/bash
echo "Brian's Archive CUE/FLAC Splitter v0.1"
echo "No sanity checking in place. Be careful."

if [ $# != 2 ]
then
       echo ""
       echo "Usage:"
       echo "    $0 cue_file ape_flac_file"
       echo ""
       exit 1
fi

#Get the filenames
cuefile=$1
flacfile=$2

#Other variables
tracks=$(cueprint -d '%N' "$cuefile")

#Get the filenames into an array
count=1
while [ $count -le $tracks ]
do
       tracknames[$count]=$(cueprint -n$count -t '%p-%T-%02n-%t' "$cuefile"|sed -e s@/@,@g)
       count=`expr $count + 1`
done

#Load up the ID3 tag info into variables for later use
id3count=1
while [ $id3count -le $tracks ]
do
       artist[$id3count]=$(cueprint -n$id3count -t '%p' "$cuefile")
       album[$id3count]=$(cueprint -n$id3count -t '%T' "$cuefile")
       tracknum[$id3count]=$(cueprint -n$id3count -t '%02n' "$cuefile")
       title[$id3count]=$(cueprint -n$id3count -t '%t' "$cuefile")
       echo "Artist: ${artist[$id3count]}"
       echo "Album: ${album[$id3count]}"
       echo "Track No: ${tracknum[$id3count]}"
       echo "Song Title: ${title[$id3count]}"
       id3count=$[$id3count + 1]
done

#Output general file information
cueprint -d '%P - %T\n' "$cuefile"
echo "Total number of tracks: " $tracks

#Split this bitch
cuebreakpoints "$cuefile" | shntool split -a '' -n '%02d' -o wav "$flacfile"

#Convert those waves into mp3s
convertcount=1
while [ $convertcount -le $tracks ]
do
       wavenum=`printf "%02d" $convertcount`

       lame --add-id3v2 --noreplaygain -b 320 --ta "${artist[$convertcount]}" --tl "${album[$convertcount]}" --tn "${tracknum[$convertcount]}" --tt "${title[$convertcount]}" "$wavenum.wav" "${tracknames[$convertcount]}.mp3"
       rm "$wavenum.wav"
       convertcount=$[$convertcount + 1]

done
I had problem with heavy loaded CPU when I opened more than 2 instance of uTorrent, my Outpost gone crazy.
Deep investigation showed that all TCP and UDP traffic were passed NOD32.
Problem was fixed after I set up NOD32 not to check traffic.
SNMP (Simple Network Management Protocol) is an internet protocol used in network management systems to monitor network-attached devices such as computers, servers, routers, switches, gateways, wireless access points, VoIP phones, and etc. for conditions that warrant administrative attention. SNMP provides management data in the form of variables on the managed systems, which describe the system configuration parameter or current status value. These variables can then be read and queried (or sometimes set or write) by managing applications. Windows system running XP, Vista or 2003 does not turn on SNMP service by default, thus users need to manually install and enable SNMP service.
Note that you must be logged on as an administrator or a member of the Administrators group in order to complete this procedure. If your computer is connected to a network, network policy settings may also prevent you from completing this procedure.
How to Install and Enable the SNMP Service
In Windows Vista, click Start button, then go to Control Panel. Click on Programs link and then click on Turn Windows features on or off. If you’re prompted with User Account Control dialog, click “Continue”.
In Windows Features of Vista, locate SNMP feature.
Two new services will be created:
Windows doesn’t assign any community string to the SNMP service by default, and also only allow access from localhost or local devices. Further configuration is needed to add in desired community string, which act as the password to grant reply to any SNMP request from remote system.
How to Configure SNMP Service (Add “public” community string)
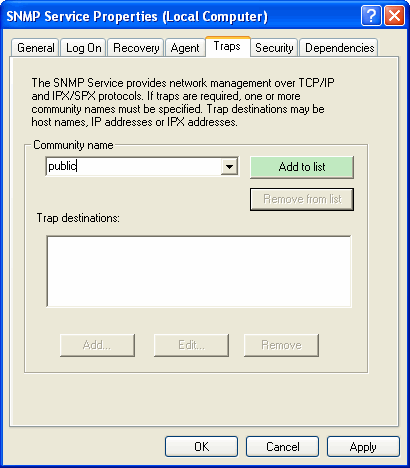
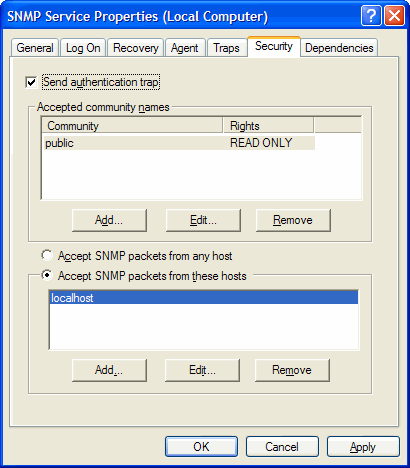
How to Configure Security for SNMP Service for a Community
To limit the acceptance of SNMP packets, click Accept SNMP packets from these hosts, and then click Add, and then type the appropriate host name, IP or IPX address in the Host name, IP or IPX address box. You can restrict the access to local host or limited servers only by using this setting. Finish off by clicking Add button again.
Have strange problem with Helm.refresh.service, after 1-2 hr working this service started use 150 mb and more( after 12 hr usually it eat 1,6 Gb)
:) fix: login to cp server, run process explorer and check MSSQL server resource usage, if it more then 30% processor time and much mem just restart it. and Helm.refresh.service back to normal state. :) also check helm tasks.
Some times it necessary to reinstall ASP.NET 2.0

